Begin Of Process

Begin Of Process

By Howie.Hxu

前言

在android的世界中,google为我们屏蔽掉了很多操作系统层面的细节。
以至于很多人都习惯性提到android系统,android架构,android程序。
“然鹅”,android其本身只是跑在linux上的一个进程而已,对于linux的世界而言:

android仅仅是一个跑在user space的进程罢了

只是它比起其他的hello world拥有了更多的变化,更多的封装以及更多的child process。
从init进程开始,经历zygote的演化,到各个service的建立,最终为service manager 
& system_server所统一。整个android构建了一个基于linux的神奇世界,而像activity,
service,content provider,boardcast通过intent这条纽带,把linux下process,user
等概念完美地保护了起来。

本文主要想通过分析“process在android中是如何启动”,从而看看android世界中的“process”

RTFSC

Process.start

在android的世界中,启动一个Process主要是通过Process.start来完成的:

1
2
3
4
5
6
7
8
9
10
11
12
13
14
15
16
public static final ProcessStartResult start(final String processClass,
final String niceName,
int uid, int gid, int[] gids,
int debugFlags, int mountExternal,
int targetSdkVersion,
String seInfo,
String abi,
String instructionSet,
String appDataDir,
String[] zygoteArgs) {
try {
return startViaZygote(processClass, niceName, uid, gid, gids,
debugFlags, mountExternal, targetSdkVersion, seInfo,
abi, instructionSet, appDataDir, zygoteArgs);
} ......
}

结合老罗的blog《Android系统进程Zygote启动过程的源代码分析》,我们了解:

应用的启动最终都是通过跟Zygote进行socket通讯,最终由Zygote进程fork出来的。

简单介绍一下这边的参数:

processClass: 可以认为是main函数所在的class,一般都是“android.app.ActivityThread”
niceName:进程名,一般来说都是package + AndroidManifest.xml中指定的process:XXX字段
uid:user id,一般应用程序都是从10000开始,19999结束(参考Process.java中定义)
gid:group id
gids:AndroidManifest.xml中申请的一些列权限
debugFlags:debug flags,来自Zygote.java,诸如:DEBUG_ENABLE_DEBUGGER
mountExternal:mount mode
targetSdkVersion:你懂的
seInfo:selinux
abi:application binary interface
instructionSet:指令集,一般为arm or mips or x86 or x64…
appDataDir:application的data目录
zygoteArgs:启动参数

其中我们比较关注的是:processClass以及niceName
至于Zygote是如何响应,并fork,然后XXXX的流程在这里就不提了,可以参考老罗的blog。

注意abi的不同会影响到是从32bit zygote or 64bit zygote的启动

Main of android.app.ActivityThread

刚才提到,processClass的

1
2
3
4
5
6
7
8
9
10
11
12
13
public static void main(String[] args) {
......
Process.setArgV0("<pre-initialized>");
Looper.prepareMainLooper();
ActivityThread thread = new ActivityThread();
thread.attach(false);
if (sMainThreadHandler == null) {
sMainThreadHandler = thread.getHandler();
}
......
Looper.loop();
......
}

在main函数中,比较重要的就是完成了Handle和进入到Looper.loop状态
另外,可以注意到:

1
thread.attach(false);

偷偷摸摸的thread.attach

这一个函数是非常重要的存在,因为它建立了与AMS的联系

1
2
3
4
5
6
7
8
9
10
private void attach(boolean system) {
sCurrentActivityThread = this;
......
RuntimeInit.setApplicationObject(mAppThread.asBinder());
final IActivityManager mgr = ActivityManagerNative.getDefault();
try {
mgr.attachApplication(mAppThread);
}
......
}
  • 先获取了AMS在本地的代理,也即IActivityManager的实例mgr
  • 通过mgr的attachApplication,进行一次RPC

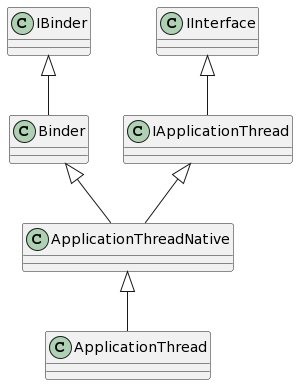
    需要注意的是这边的mAppThread,它是:ApplicationThread的实例
    看一下它的继承关系:
    PlantUML diagram

IActivityManage::attachApplication

RPC也不多说了,直接看ActivityManagerService::attachApplication

1
2
3
4
5
6
7
8
public final void attachApplication(IApplicationThread thread) {
synchronized (this) {
int callingPid = Binder.getCallingPid();
final long origId = Binder.clearCallingIdentity();
attachApplicationLocked(thread, callingPid);
Binder.restoreCallingIdentity(origId);
}
}

老规矩,这边被synchronized包起来了,所以之后的call就变成了Loced

Framework中有很多代码都是这样Locked,unLocked,checked,unChecked,不晓得是否是一样的意思

ActivityManagerService::attachApplicationLocked

这又是一个长函数,大约有200+行,好在我们不需要分析太多,主要分析跟Process启动(app相关)

1
2
3
4
5
6
7
8
9
10
11
12
private final boolean attachApplicationLocked(IApplicationThread thread,
int pid) {
......
thread.bindApplication(processName, appInfo, providers, app.instrumentationClass,
profilerInfo, app.instrumentationArguments, app.instrumentationWatcher,
app.instrumentationUiAutomationConnection, testMode, enableOpenGlTrace,
isRestrictedBackupMode || !normalMode, app.persistent,
new Configuration(mConfiguration), app.compat,
getCommonServicesLocked(app.isolated),
mCoreSettingsObserver.getCoreSettingsLocked());
......
}

所以这里又是一次RPC,来回穿插,回到了thread(IApplicationThread)所在的handle

ActivityThread::bindApplication

当回到ActivityThread的时候,就需要真正去建立Application的那些东西了

这里我们省略掉了VMRuntime.registerAppInfo的分析

1
2
3
4
5
6
7
8
9
10
11
public final void bindApplication(String processName, ApplicationInfo appInfo,
List<ProviderInfo> providers, ComponentName instrumentationName,
ProfilerInfo profilerInfo, Bundle instrumentationArgs,
IInstrumentationWatcher instrumentationWatcher,
IUiAutomationConnection instrumentationUiConnection, int debugMode,
boolean enableOpenGlTrace, boolean isRestrictedBackupMode, boolean persistent,
Configuration config, CompatibilityInfo compatInfo, Map<String, IBinder> services,
Bundle coreSettings) {
......
sendMessage(H.BIND_APPLICATION, data);
}

ActivityThread::sendMessage

直接看sendMessage,其实是对内部Handler的一层封装

1
2
3
4
5
6
7
8
9
10
11
12
13
14
15
16
private void sendMessage(int what, Object obj) {
sendMessage(what, obj, 0, 0, false);
}
private void sendMessage(int what, Object obj, int arg1) {
sendMessage(what, obj, arg1, 0, false);
}
private void sendMessage(int what, Object obj, int arg1, int arg2) {
sendMessage(what, obj, arg1, arg2, false);
}
private void sendMessage(int what, Object obj, int arg1, int arg2, boolean async) {
......
mH.sendMessage(msg);
}

sendMessage终结一个时代:

由上,我们看到了最终是call mH的sendMessage,对于mH:

1
2
3
4
5
6
7
8
9
10
11
12
13
14
final H mH = new H();
private class H extends Handler {
......
public void handleMessage(Message msg) {
......
case BIND_APPLICATION:
Trace.traceBegin(Trace.TRACE_TAG_ACTIVITY_MANAGER, "bindApplication");
AppBindData data = (AppBindData)msg.obj;
handleBindApplication(data);
Trace.traceEnd(Trace.TRACE_TAG_ACTIVITY_MANAGER);
break;
......
}

众所周知,handleMessage的触发是依赖与loop的dispatchMessage,当跑完sendMessage,我们就把一个msg
塞到了queue的最后,下面就是静静等待msg被dispatch出去,然后被对应的Handler去处理了。

因此当跑完了sendMessage

  • ActivityThread::bindApplication也就结束了
  • 因此,ActivityManagerService::attachApplicationLocked也就结束了
  • 然后,ActivityManagerService::attachApplication也跑完啦
  • app进程的RPC:IActivityManager::attachApplication就完结了
  • 所以我们就回到了ActivityThread的main:
1
2
3
4
5
6
7
8
9
10
11
12
public static void main(String[] args) {
......
Looper.prepareMainLooper();
ActivityThread thread = new ActivityThread();
thread.attach(false);
if (sMainThreadHandler == null) {
sMainThreadHandler = thread.getHandler();
}
......
Looper.loop();
......
}

Looper.loop开启另一个时代

因此,在app process的main最后,Looper.loop()浮出水面,开启了一个message dispatch的时代。
首当其冲的就是之前通过mH发送的H.BIND_APPLICATION。

在这个Looper.loop开启的时代里,我们会经历Application的初始化,content provider的安装等腥风血雨

1
2
3
4
5
6
7
8
9
10
public void handleMessage(Message msg) {
......
case BIND_APPLICATION:
Trace.traceBegin(Trace.TRACE_TAG_ACTIVITY_MANAGER, "bindApplication");
AppBindData data = (AppBindData)msg.obj;
handleBindApplication(data);
Trace.traceEnd(Trace.TRACE_TAG_ACTIVITY_MANAGER);
break;
......
}

ActivityThread::handleBindApplication

这是一个300+行的函数

所以说,函数到底可以写多长并不是一个绝对的事情,但最好还是不要写那么长。

在这其中,它:

  • 给process换了马甲:Process.setArgV0(data.processName);

    还记得之前叫什么吗? ActivityNative::main

    Process.setArgV0(““);

  • 获取LoadedApk实例
  • 创造Application实例
  • 初始化content provider
  • call Application的onCreate
    1
    2
    3
    4
    5
    6
    7
    8
    9
    10
    11
    12
    13
    14
    15
    16
    17
    18
    19
    20
    21
    private void handleBindApplication(AppBindData data) {
    ......
    Process.setArgV0(data.processName);
    ......
    data.info = getPackageInfoNoCheck(data.appInfo, data.compatInfo);
    ......
    Application app = data.info.makeApplication(data.restrictedBackupMode, null);
    mInitialApplication = app;
    ......
    if (!data.restrictedBackupMode) {
    List<ProviderInfo> providers = data.providers;
    if (providers != null) {
    installContentProviders(app, providers);
    ......
    }
    }
    ......
    mInstrumentation.callApplicationOnCreate(app);
    ......
    }

有一个比较关键的变量AppBindData data,其实它是在Process.start之前被创建出来的。
这里仅仅做一个记录,为了以后trace更加方便而已。

1
2
3
4
5
6
7
8
9
Process.ProcessStartResult startResult = Process.start(entryPoint,
app.processName, uid, uid, gids, debugFlags, mountExternal,
app.info.targetSdkVersion, app.info.seinfo, requiredAbi, instructionSet,
app.info.dataDir, entryPointArgs);
......
synchronized (mPidsSelfLocked) {
this.mPidsSelfLocked.put(startResult.pid, app);
......
}

LoadedApk::makeApplication

言归正传,从handleBindApplication中,尝试makeApplication,传入的参数:

forceDefaultAppClass : false
instrumentation = null

1
2
3
4
5
6
7
8
9
10
11
12
13
14
15
16
17
18
19
20
21
public Application makeApplication(boolean forceDefaultAppClass,
Instrumentation instrumentation) {
......
String appClass = mApplicationInfo.className;
if (forceDefaultAppClass || (appClass == null)) {
appClass = "android.app.Application";
}
try {
java.lang.ClassLoader cl = getClassLoader();
......
ContextImpl appContext = ContextImpl.createAppContext(mActivityThread, this);
app = mActivityThread.mInstrumentation.newApplication(
cl, appClass, appContext);
......
}
......
mApplication = app;
......
return app;
}

LoadedApk是从package parser拿来的,可以认为是跟apk有关。
从代码中,我们可以看到,appClass其实获取的是当前apk中的application的className。
而对于那些没有去写application类的apk们,我们default给予了:”android.app.Application”
这也是为什么就算不写自定义的application类,我们也可以有application初始化的原因,继续往下:

1
2
3
ContextImpl appContext = ContextImpl.createAppContext(mActivityThread, this);
app = mActivityThread.mInstrumentation.newApplication(
cl, appClass, appContext);

创建app context,然后通过mInstrumentation去做newApplication。

Instrumentation::newApplication

这里就是一些耳熟能详的flow了:

  • 先是load对应的application
  • 然后通过newInstance创建对应的实例
  • 再调用attach函数进入到Application的attachBaseContext
1
2
3
4
5
6
7
8
9
10
11
12
13
public Application newApplication(ClassLoader cl, String className, Context context)
throws InstantiationException, IllegalAccessException,
ClassNotFoundException {
return newApplication(cl.loadClass(className), context);
}
static public Application newApplication(Class<?> clazz, Context context)
throws InstantiationException, IllegalAccessException,
ClassNotFoundException {
Application app = (Application)clazz.newInstance();
app.attach(context);
return app;
}

注意,对于继承Application的Customer Application,一定记得在attachBaseContext中call super.attachBaseContext

1
2
3
4
5
6
7
8
9
10
11
/* package */ final void attach(Context context) {
attachBaseContext(context);
mLoadedApk = ContextImpl.getImpl(context).mPackageInfo;
}
protected void attachBaseContext(Context base) {
if (mBase != null) {
throw new IllegalStateException("Base context already set");
}
mBase = base;
}

只有在Application的attachBaseContext中,我们会做mBase的赋值

ActivityThread::installContentProviders

偷懒一下,关于这一块的内容,可以参考老罗的文章《Android应用程序组件Content Provider的启动过程源代码分析》
大家可以直接从step 15开始看 ,这一部分全部走完,就会跑到Content Provider的onCreate中去了。

Instrumentation::callApplicationOnCreate

瞅一瞅源码,发现也没什么

1
2
3
public void callApplicationOnCreate(Application app) {
app.onCreate();
}

自然就跑到了Application的onCreate函数了。
跑完了callApplicationOnCreate,对于ActivityThread::handleBindApplication的分析也就结束了。

因此ActivityThread的message queue又进入到了busy loop的状态,等待下一个msg的到来。
而整个process的启动到这里就结束了。
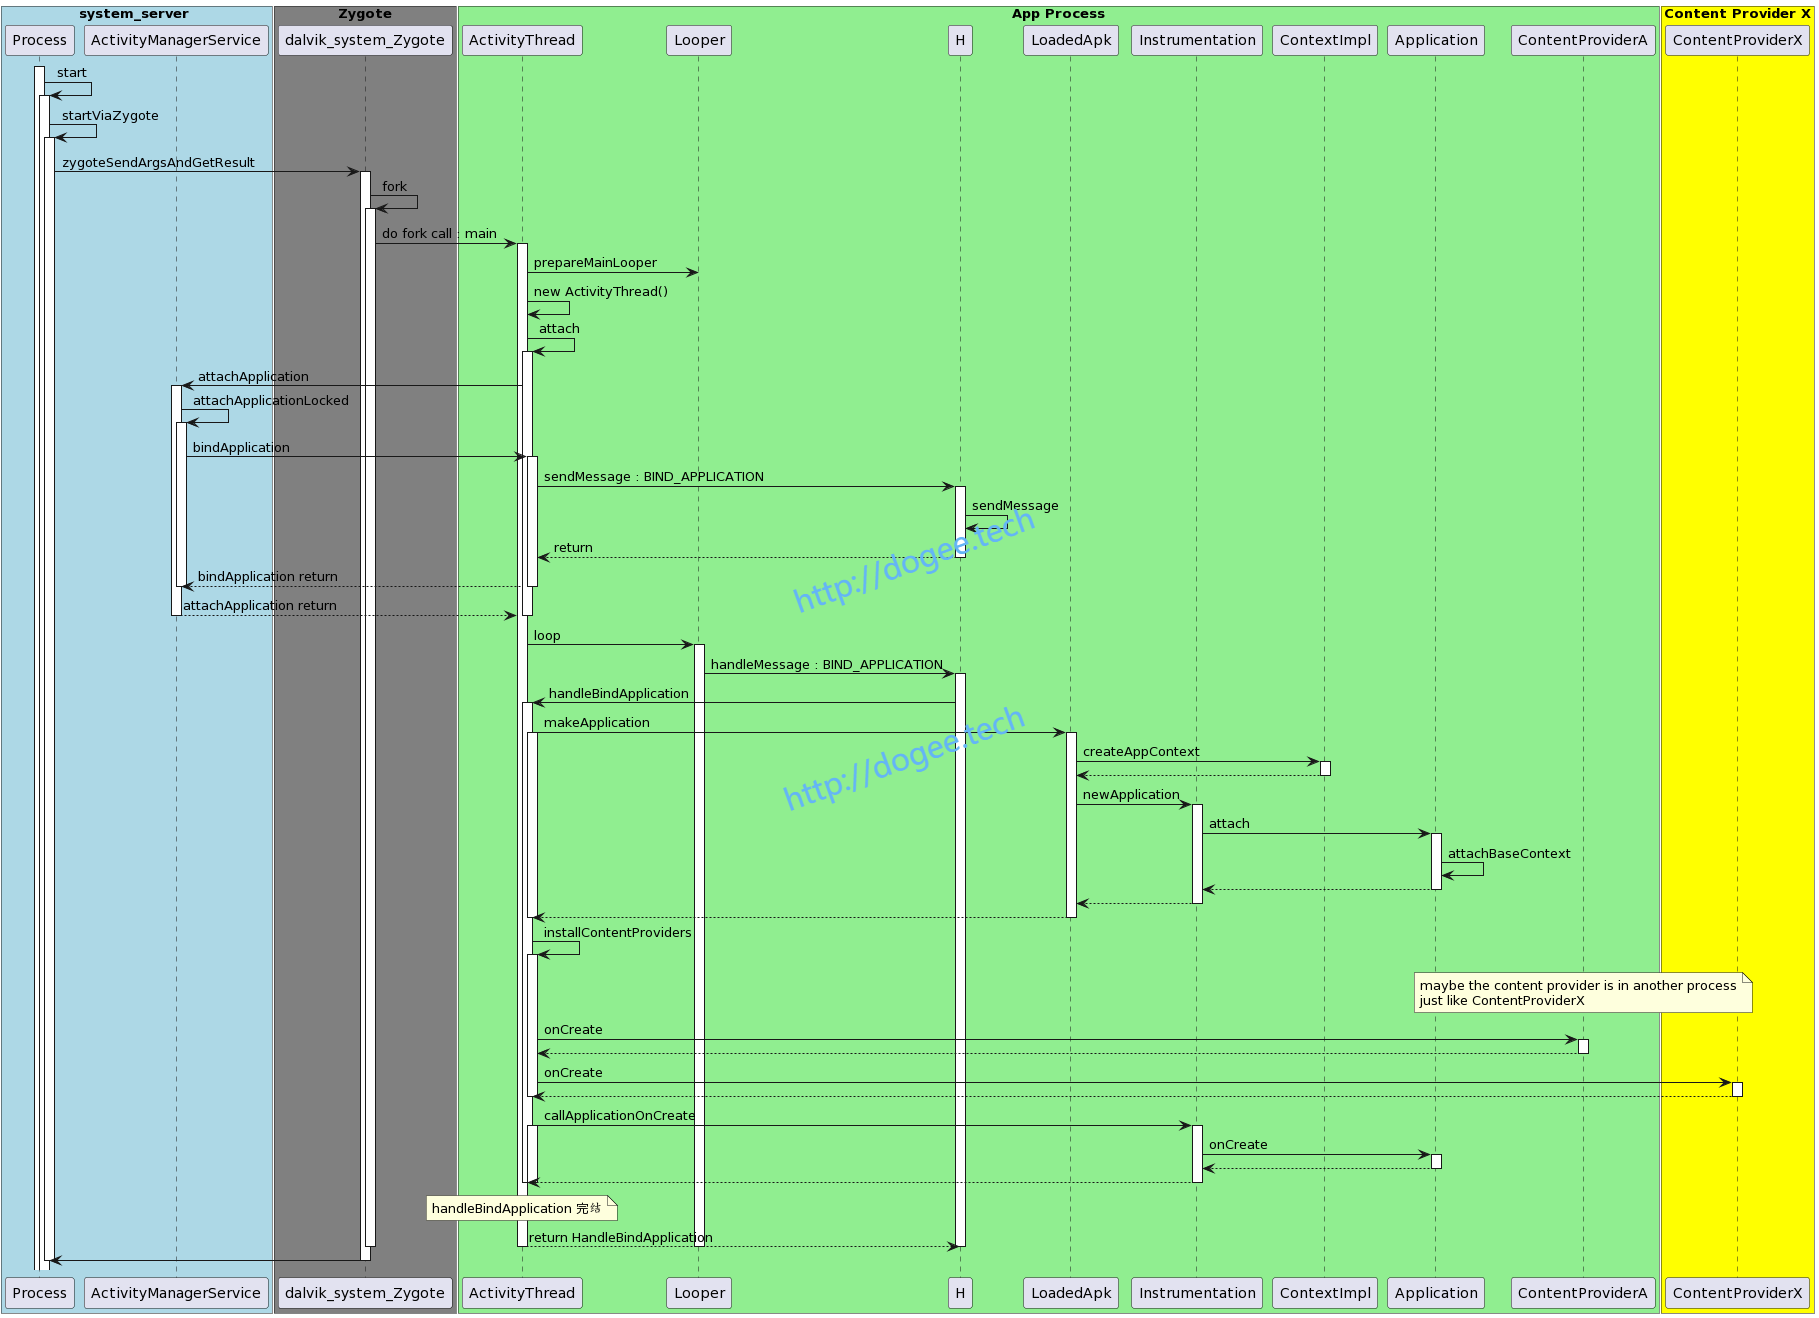
一张流程图

其中content provider的部分: Content Provider X是为了说明content provider是在另外一个独立进程(just for example)
不同颜色代表的不同的进程,一个process的启动经历了3个进程的协同工作。

  • system_server
  • zygote (zygote32)
  • App process

PlantUML diagram

小结

对于Process的启动,所有的入口都在AMS,只有AMS才会去call Process.start。
而上层app启动Process主要来源又在于startActivity以及使用content provider。
但无论它们最后的flow是怎么样的,最初的落脚点都会在BindApplication
因此对于apk来说,process启动的初期阶段,apk包中的application肯定会进行初始化。

其顺序:

  • Application::attachBaseContext
  • ContentProvider::onCreate
  • Application::onCreate