InstantRun

Android Studio Instant Run

By Howie.Hxu

什么是InstantRun

Android Studio2.0推出的一项新功能,google的官方介绍:请看这里
可以实现apk快速部署(快速安装),还有什么冷启动,热插拔之类,简单来说就是代码修改完成了,targe设备马上就显示不同了。
这里还有一篇helloworld式的InstantRun中文介绍:传送门
顺带提一下,从InstantRun的技术角度出发,它也可以算的上是插件化开发的一种,热加载/热修复(动态加载了新的dex or dex拆分)。

研究的契机

最早是想写一个multi dex的项目demo,用来泡DroidPlugin的框架,想尝试看看能否加载起来。
而在各种机缘巧合下,android studio又升级到了2.2,然后就很悲催的发现demo fail。
从异常的log来看则是各种class找不到。而且一眼看过去都是一些非常明显的错误。
ClassNotFoundError
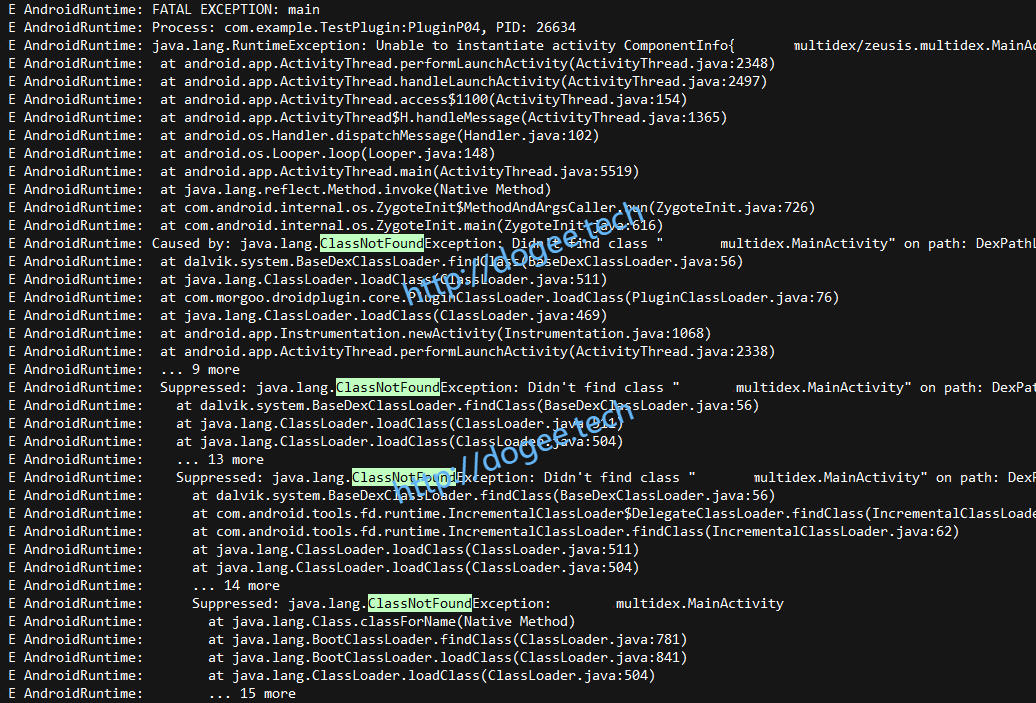
主activity居然都没有找到。而主activity则是在application构造的时候被创建的,所以..看起来问题很严重。

从jar包开始

反编译的故事

通过查阅资料可以发现,InstantRun其实就是multi dex,那么我们就需要从编译完成的apk中来一览究竟了。

  • 首先,我们可以看看正常apk包是什么样的:
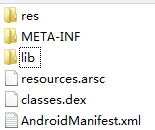
    normal_apk

    • resource包
    • lib
    • dex文件
    • AndroidManifest.xml
      这是一套非常标准的apk包结构,对于classloader来说,会直接load dex文件之后再去做loadClass,一切都很自然地发生了。
      当然了我们也可以把dex通过反编译工具打开看看。

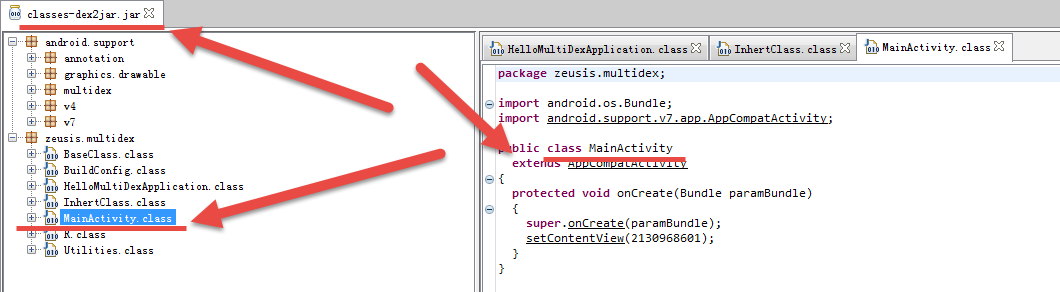
      可以看到从dex反编译拿到的class中明显就..什么都有!
  • 那让我们再来看看InstantRun的包结构:
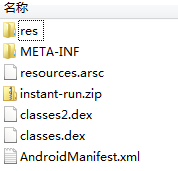
    InstantRun_apk

    • res
    • instant-run.zip(?)
    • class2.dex
    • class.dex(?)
    • AndroidMantifest.xml
      从这一套中我们可以明显看到与之前normal的不同了,首先是多了一个instant-run.zip包,然后是dex也变成了两个。
      老规矩,我们解开class.dex看看
      InstantRun_Class
      这个dex居然是什么都没有,好在我们还有一个class2.dex,继续做一下反编译:
      InstantRun_Class23
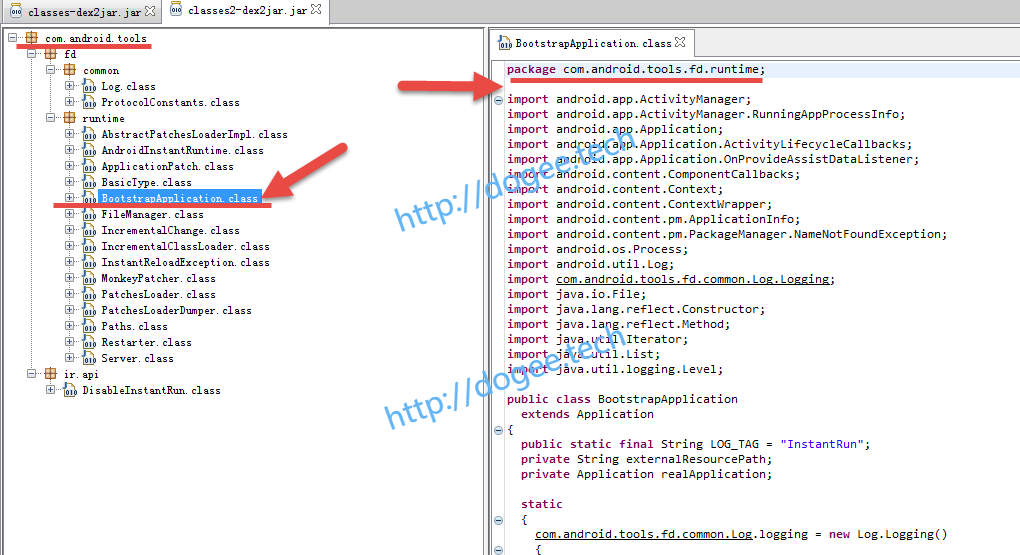
      结果在这个class2.dex中也没有我们的multidex.MainActivity.class,而是多了一大堆不晓得从哪里来的class。
      关于这一点,我还反复去AndroidStudio中查看&确认,实在是没有搞明白为什么我会写出那么多莫名其妙的,类(累)
      最后没有招了,只得去build中间文件中查找:
      1
      2
      3
      path:
      app\build\intermediates\incremental-classes\debug\instant-run-bootstrap.jar
      app\build\intermediates\incremental-runtime-classes\debug\instant-run.jar

这两个jar包分别就对应了class.dex以及class2.dex,于是我们又回到了老问题,multidex.MainActivity.class去哪里了?

消失的MainActivity

上图中,我们能用的招数都用完了,class.dex以及class2.dex并没有什么真相。
回头看看好像还有一个InstantRun.zip似乎有那么点嫌疑,先解压缩看看:
InstantRun_Zip
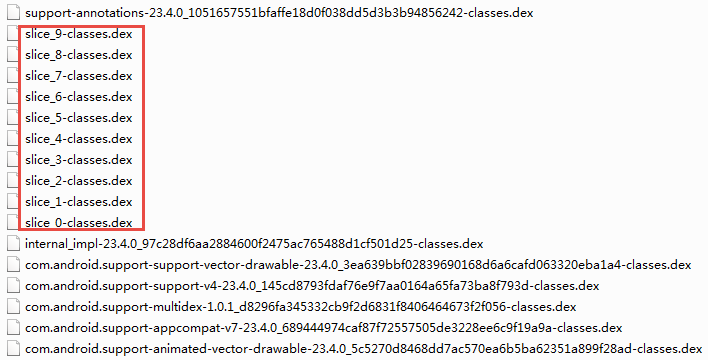
解压缩的zip包中出现了很多的dex,逐个pickup,当打开slice5的时候…
slice5
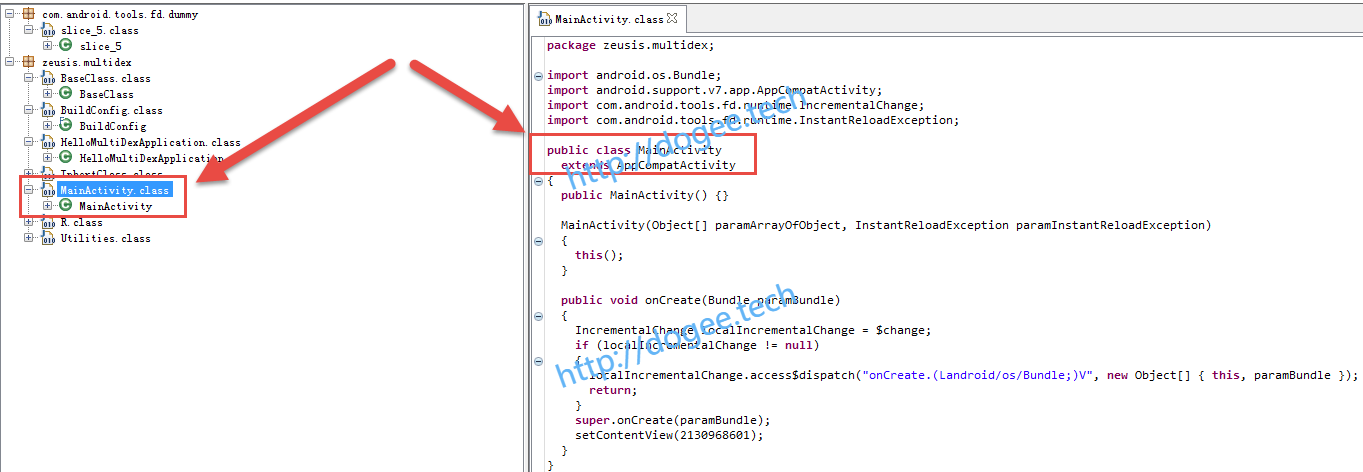
原来MainActivity在这里,所以言归正传。对于MainActivity来说,我们需要load到slice_5-classes.dex,才可以真正加载到它。

关于InstantRun原理的分析

可以参考一下这篇文档:深度理解Android InstantRun原理以及源码分析

Read the fucking source Code

通过阅读深度理解Android InstantRun原理以及源码分析我们了解到:
对于InstantRun的apk来说,原本的application已经被变动过了。
在使用gradle进行编译的时候,它会构造一个:com.android.tools.fd.runtime.BootstrapApplication,首先启动的是
BootstrapApplication,function call依次为attachBaseContext和onCreate。

BootstrapApplication.class

attachBaseContext

通过反编译的方式获取到attachBaseContext的代码:

1
2
3
4
5
6
7
8
9
10
11
12
13
14
15
16
17
18
19
20
21
22
23
24
25
26
27
28
29
30
31
protected void attachBaseContext(Context paramContext)
{
Object localObject;
if (!AppInfo.usingApkSplits)
{
localObject = paramContext.getApplicationInfo().sourceDir;
if (localObject == null) {
break label105;
}
}
for (long l = new File((String)localObject).lastModified();; l = 0L)
{
createResources(l);
setupClassLoaders(paramContext, paramContext.getCacheDir().getPath(), l);
createRealApplication();
super.attachBaseContext(paramContext);
if (this.realApplication != null) {}
try
{
localObject = ContextWrapper.class.getDeclaredMethod("attachBaseContext", new Class[] { Context.class });
((Method)localObject).setAccessible(true);
((Method)localObject).invoke(this.realApplication, new Object[] { paramContext });
return;
}
catch (Exception paramContext)
{
label105:
throw new IllegalStateException(paramContext);
}
}
}

这里需要着重注意的是这些function:

1
2
3
4
createResources(l);
setupClassLoaders(paramContext, paramContext.getCacheDir().getPath(), l);
createRealApplication();
super.attachBaseContext(paramContext);

好在深度理解Android InstantRun原理以及源码分析已经有大体的分析过程。
这边主要讲一下它没有讲到的部分,主要是classloader的部分,继续看:

1
setupClassLoaders(paramContext, paramContext.getCacheDir().getPath(), l);

这里的Context是真实的(未被gradle改造过),也即可以认为是将来Application中的mBase(context对象)。
进一步分析setupClassLoaders:

setupClassLoaders

这个函数的主要作用是建立classloader,并加载那些instantRun目录下的dex

1
2
3
4
5
6
7
8
9
10
11
12
13
14
15
16
17
18
19
20
21
22
23
24
25
26
27
28
29
30
31
private static void setupClassLoaders(Context paramContext, String paramString, long paramLong)
{
List localList = FileManager.getDexList(paramContext, paramLong);
ClassLoader localClassLoader;
if (!localList.isEmpty())
{
if (Log.isLoggable("InstantRun", 2)) {
Log.v("InstantRun", "Bootstrapping class loader with dex list " + join('\n', localList));
}
localClassLoader = BootstrapApplication.class.getClassLoader();
}
try
{
String str = (String)localClassLoader.getClass().getMethod("getLdLibraryPath", new Class[0]).invoke(localClassLoader, new Object[0]);
paramContext = str;
if (Log.isLoggable("InstantRun", 2))
{
Log.v("InstantRun", "Native library path: " + str);
paramContext = str;
}
}
catch (Throwable paramContext)
{
for (;;)
{
Log.e("InstantRun", "Failed to determine native library path " + paramContext.getMessage());
paramContext = FileManager.getNativeLibraryFolder().getPath();
}
}
IncrementalClassLoader.inject(localClassLoader, paramContext, paramString, localList);
}

这里有两个点需要分析:

  1. 获取当前dexlist的目录地址:
1
List localList = FileManager.getDexList(paramContext, paramLong);
  1. 加载classloader,并构造出classloader的父子关系(原本的application的classloader为子,gradle构造的BootstrapApplication的classloader为父)
1
IncrementalClassLoader.inject(localClassLoader, paramContext, paramString, localList);

FileManager.getDexList

这个函数很长,我们简化一下:

1
2
3
4
5
6
7
8
9
10
11
12
13
14
15
16
17
18
19
20
public static List<String> getDexList(Context paramContext, long paramLong)
{
File localFile2 = getDataFolder();
……
File localFile1 = getDexFileFolder(localFile2, false);
……
if ((localFile1 == null) || (!localFile1.isDirectory()))
{
……
localFile1 = getDexFileFolder(localFile2, true);
……
arrayOfFile1 = extractSlices(localFile1, null, -1L);
if (arrayOfFile1.length > 0) {
i = 1;
}
}
……
Collections.sort(paramContext, Collections.reverseOrder());
return paramContext;
}

在getDexList中又有了N多个getFile的操作,这些操作分别是获取了什么?

FileManager.getDataFolder
1
2
3
4
private static File getDataFolder()
{
return new File(Paths.getDataDirectory(AppInfo.applicationId));
}

从这个函数里,我们发现它其实是需要去访问File(Paths.getDataDirectory(AppInfo.applicationId))
继续看一下Path和AppInfo:

1
2
3
4
5
6
7
8
9
10
11
12
13
14
15
16
17
18
19
20
21
22
public class AppInfo
{
……
public static String applicationId = "multidex";
……
}
public final class Paths
{
……
public static String getDataDirectory(String paramString)
{
return "/data/data/" + paramString + "/files/instant-run";
}
……
public static String getDexFileDirectory(String paramString)
{
return getDataDirectory(paramString) + "/" + "dex";
}
……
}

因此对于FileManager.getDataFolder 来说,其实它指向了:
/data/data/multidex/files/instant-run

这里存在一个蛮有意思的点:对于instantRun应用来说,它写死了当前dex的路径
这也是对于PlugIn启动app的时候,为什么我们会找不到对应dex的原因
android中对于不同应用会有不同的userid,不同userid的权限不同,不能交叉访问。
因此..native hook是势在必行了,这是后话

FileManager.getDexFileFolder

依葫芦画瓢,这边getDexFileFolder其实是指向了:
/data/data/multidex/files/instant-run/dex

FileManager.extractSlices

这个function可以认为是简单的把dex文件找到。
省略掉部分细节后如下:

1
2
3
4
5
6
private static File[] extractSlices(File paramFile, File[] paramArrayOfFile, long paramLong)
{
……
localInputStream = BootstrapApplication.class.getResourceAsStream("/instant-run.zip");
……
}

数据的来源即:instant-run.zip
至此,FileManager.getDexList(paramContext, paramLong);的部分算是告一段落。
它最终会拿到一个list,其中会包含了instant-run.zip目录下的那些dex文件,同时这些dex文件会被存放到:/data/data/multidex/files/instant-run/dex目录下。

IncrementalClassLoader.inject

继续往下走,看一下IncrementalClassLoader.inject,前面有提到这支function的作用:

加载classloader,并构造出classloader的父子关系(原本的application的classloader为子,gradle构造的BootstrapApplication的classloader为父)

1
2
3
4
5
6
public static ClassLoader inject(ClassLoader paramClassLoader, String paramString1, String paramString2, List<String> paramList)
{
paramString1 = new IncrementalClassLoader(paramClassLoader, paramString1, paramString2, paramList);
setParent(paramClassLoader, paramString1);
return paramString1;
}
new IncrementalClassLoader

在inject中,首先是new IncrementalClassLoader:

1
2
3
4
5
public IncrementalClassLoader(ClassLoader paramClassLoader, String paramString1, String paramString2, List<String> paramList)
{
super(paramClassLoader.getParent());
this.delegateClassLoader = createDelegateClassLoader(paramString1, paramString2, paramList, paramClassLoader);
}
super

这里上来就是super,我们再去观察一下IncrementalClassLoader的继承关系:

1
public class IncrementalClassLoader extends ClassLoader

因此,这边的super就需要去ClassLoader中看了,而对于ClassLoader来说:

1
2
3
4
5
6
7
8
9
10
11
12
13
14
public abstract class ClassLoader {
……
protected ClassLoader(ClassLoader parentLoader) {
this(parentLoader, false);
}
ClassLoader(ClassLoader parentLoader, boolean nullAllowed) {
if (parentLoader == null && !nullAllowed) {
throw new NullPointerException("parentLoader == null && !nullAllowed");
}
parent = parentLoader;
}
……
}

好在这边只是简单的做了一下父子关系的赋值。

IncrementalClassLoader.createDelegateClassLoader
1
2
3
4
private static DelegateClassLoader createDelegateClassLoader(String paramString1, String paramString2, List<String> paramList, ClassLoader paramClassLoader)
{
return new DelegateClassLoader(createDexPath(paramList), new File(paramString2), paramString1, paramClassLoader, null);
}

ok,这边又牵扯出了另外一个类:DelegateClassLoader

关于DelegateClassLoader
1
2
3
4
5
6
7
private static class DelegateClassLoader extends BaseDexClassLoader
{
private DelegateClassLoader(String paramString1, File paramFile, String paramString2, ClassLoader paramClassLoader)
{
super(paramString1, paramFile, paramString2, paramClassLoader);
}
}

从源代码上来看,DelegateClassLoader是继承自BaseDexClassLoader,继续去看一下

1
2
3
4
5
public BaseDexClassLoader(String dexPath, File optimizedDirectory,
String libraryPath, ClassLoader parent) {
super(parent);
this.pathList = new DexPathList(this, dexPath, libraryPath, optimizedDirectory);
}

再回头看一下IncrementalClassLoader.createDelegateClassLoader传入的四个参数

  1. String paramString1:native library的path
  2. String paramString2: paramContext.getCacheDir(),mBase对象的getCacheDir目录
  3. List paramList: 从FileManager.getDexList获取到的dex list
  4. ClassLoader paramClassLoader: BootstrapApplication.class.getClassLoader()

因此对于DelegateClassLoader来说,它的构造函数四参数为:

  1. createDexPath(paramList):得到dex list String化的列表,代码部分抽取后如下
1
2
3
4
5
6
7
8
9
10
11
12
13
private static String createDexPath(List<String> paramList)
{
StringBuilder localStringBuilder = new StringBuilder();
Iterator localIterator = paramList.iterator();
if (localIterator.hasNext())
{
……
localStringBuilder.append(File.pathSeparator);
……
}
……
return localStringBuilder.toString();
}
  1. new File(paramString2):cache dir
  2. paramString1:native library path
  3. paramClassLoader:仍旧为BootstrapApplication.class.getClassLoader

有了以上的分析,继续看DelegateClassLoader的super,也就是BaseDexClassLoader

  1. String dexPath:createDexPath(paramList),instant-run.zip中得到那些dex文件
  2. File optimizedDirectory:cache文件夹路径
  3. String libraryPath:native library的路径
  4. ClassLoader paramClassLoader: BootstrapApplication.class的classloader

之后的flow就会进入到BaseDexClassLoader的flow,在这其中会去做fork进程, call execv调用dex2oat获得oat文件(待写)。
写到这里,instant-run对于classloader加载就算完成了。
而之后如何去调用我们真正的Application,则直接参考深度理解Android InstantRun原理以及源码分析即可。

写在最后

通过以上的分析,我们可以知道对于instant-run的apk来说,它会做hard-code写死了当前app需要加载的dex文件路径。
哪怕我们通过packageManager去修改ApplicationInfo或者通过LoadApk去修改context对象,都没有办法达到hook的目录。
所以这边就不得不使用到native hook的技术,也即从native层去hook掉这些i/o的操作。